The pineapple is quite possibly the world’s friendliest fruit. In many places around the world, it has become a symbol of hospitality and friendship. On our family trip to Charleston, South Carolina last year, we learned that the pineapple is a symbol of Southern charm and warmth. During colonial times in Charleston, a sea captain’s return home was announced by the spearing of a pineapple onto the home’s fence post. It was an open-ended invitation for friends and neighbors to visit the captain’s house to celebrate his safe return while listening to stories of his seafaring adventures. Pineapples have made their way into the city’s architecture, artwork, jewelry, and furniture. At our house, it’s made it’s way into salads, desserts, smoothies, and this delectable Pineapple Tart.
I don’t know how I never saw this before, but in writing this post, I came to the realization that many of my favorite things have pineapple in them…
- Favorite drink: Piña Colada
- Favorite salad: Pineapple Avocado Salad
- Favorite dish to order at our local Thai restaurant: Pineapple Fried Rice
- Favorite cake: Pineapple Upside Down Cake
And, last but not least, my favorite pie – a Pineapple Pie (Pastel de Piña) from my early childhood in Nicaragua. This Pineapple Tart is a variation of that amazing and nostalgic pie.
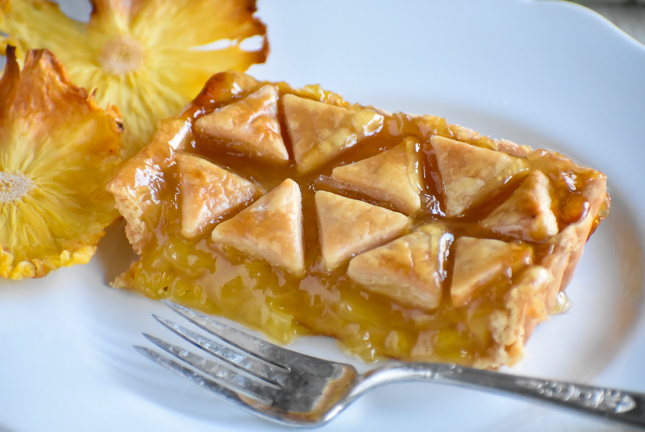
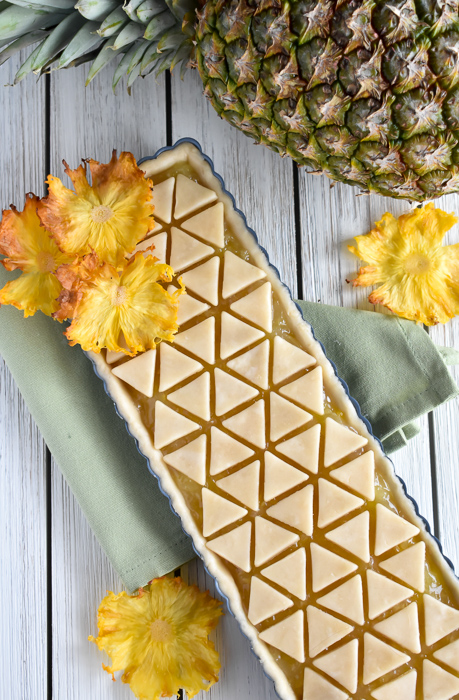
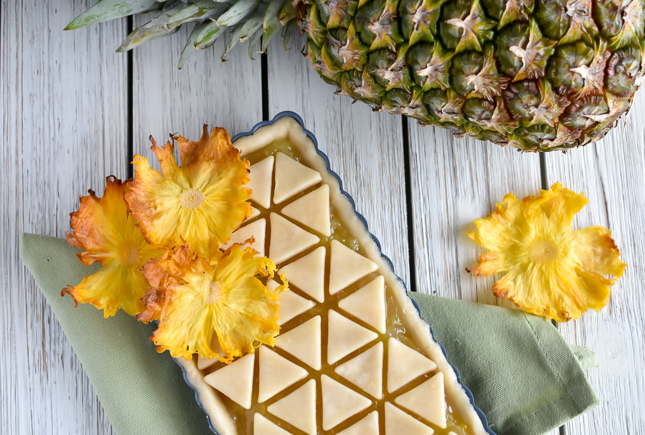
The Pastel de Piña I know and love is actually a slab pie with a lattice top – large, rectangular, and about an inch high. It’s perfect for enjoying at picnics, BBQ’s, and the beach. Traditional Nicaraguan Pastel de Piña has a golden, tender dough as its base and its lattice top. Sandwiched between the buttery pastry is the pineapple filling. This filling is outstanding. I can easily say that no pie in any combination of flavors (including apple pie, which I love and is hard to beat), has ever topped this one for me. It is sticky, sweet, pineapple goodness, and insanely good.
I’ve turned that pie into a pretty little tart this time because I’ve been looking for an excuse to use my new tart pans. Feel free to make this into a slab pie by using a sheet pan with 1 inch sides or you could also bake it into a round tart or pie, mini pies, etc. And, if you are pressed for time, store-bought pie crust is fine too. This recipe is intended for a regular pie or tart-sized pan and not a deep dish one.
This tart is composed of two parts – dough and filling. It’s best to prepare the dough the day before you plan on serving the tart because it needs time to rest and chill. Whenever I make a pie, I usually go this route. Pie dough and I are not the best of friends, so prepping the dough early gives me a chance to recite positive affirmations to myself and get into battle mode. I’ve searched far and wide for a pie dough that is cooperative, but it hasn’t been an easy task. My biggest hurdle – finding a dough that results in a flavorful and flaky crust that can be transferred to a pie pan without tearing. While I still struggle, I have taught myself a couple of tricks along the way in order to keep my sanity.
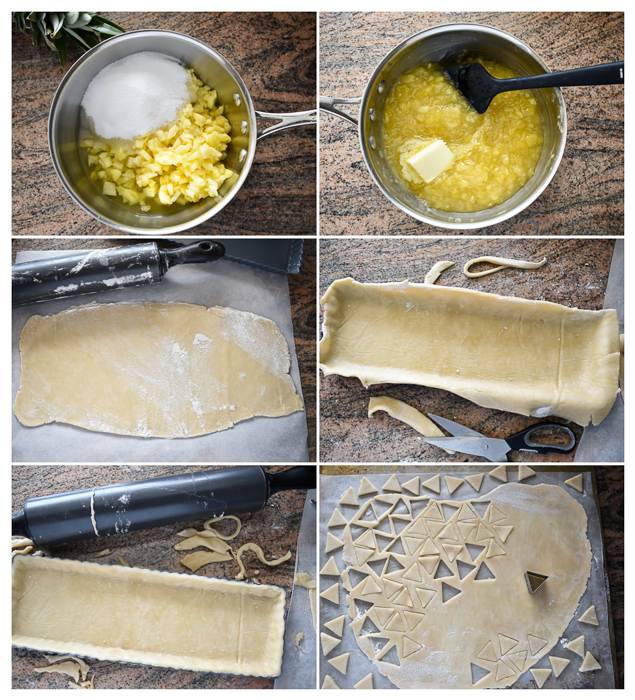
This dough recipe is from the first baking book I ever bought myself, Baking with Julia. It is both flavorful (because of the butter) and flaky (because of the shortening). In fact, in the book, it’s called Flaky Pie Dough. It’s easy to make with either a regular mixer or food processor and results in a delicious, very flaky, and tender crust. Since it has a good amount of shortening in it, it produces a very soft dough. This can be a little challenging. However, I worked around that by rolling the dough on parchment paper and placing it in the freezer for a few minutes when it got hard to handle. I also made sure to use a little extra flour anytime it began to stick to my rolling pin.
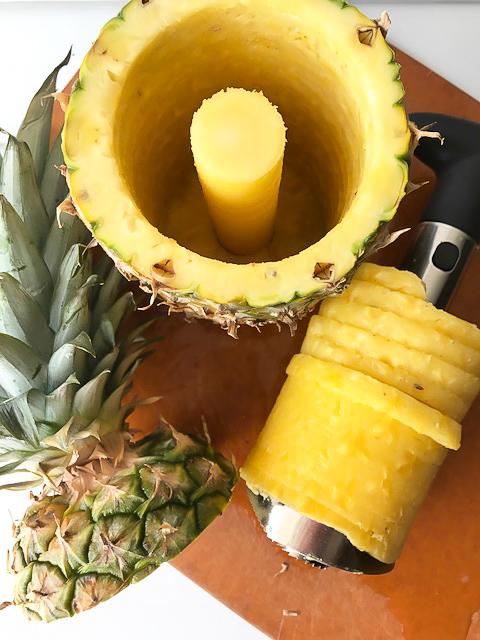
On to the filling. This filling is the whole reason I put myself through pie crust anguish. It is pure heaven and made with only 5 ingredients (not counting a little water) – pineapple, sugar, salt, cornstarch, and butter. I recommend using fresh pineapple. I have used canned crushed pineapple in this recipe and while it is still very good, the flavors of using the fresh fruit just can’t be beat. Many grocery stores sell whole peeled pineapple these days, which is a great time saver. Last year, I bought myself the most amazing and fun kitchen tool – this pineapple corer/peeler/slicer. It’s so easy to use. There’s a quick video on this post if you’re curious.
Anyway, back to the filling…It cooks on the stove-top for about 35 minutes, goes into the unbaked crust, and then into the oven for 40-50 minutes. Something magical happens to this filling in the oven. It transforms from simply a nice tasting bright yellow pineapple curd to a thick, sticky, golden brown, jam-like one that tastes of deeply caramelized pineapple. In the Pie Olympics (if there was such a thing), this one would bring home the gold every time.
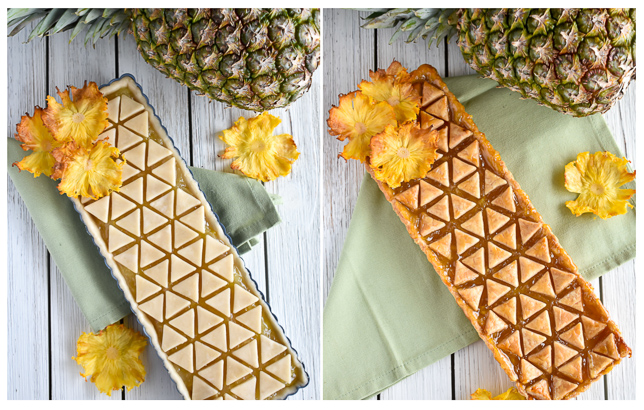
I decorated mine using small dough triangles in attempting to highlight the pineapple’s cool geometry, but you could use whatever decorations you like. I made the flower decorations by slow roasting thin slices of pineapple and then placing them into muffin cups as they cooled. They look great as cake or cupcake toppers too.
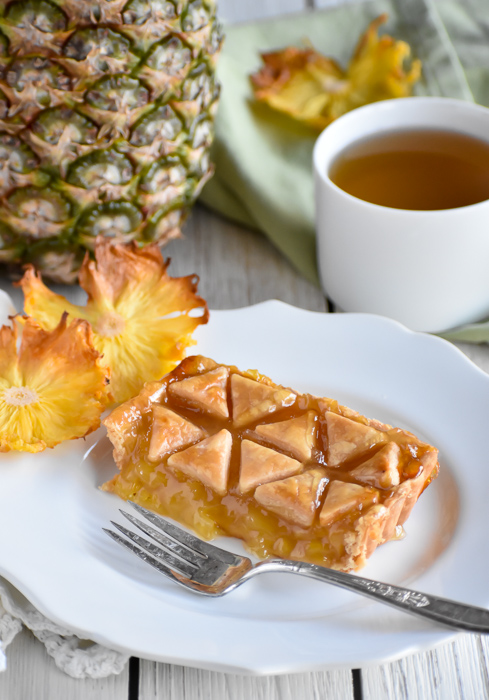
This Pineapple Tart with its bright and sunny filling, is sure to make you very happy. Invite your favorite people over to enjoy a slice with a cup of tea…because life is short, you work hard, and you deserve this. You really do.
Pineapple Tart
My all-time favorite pie. A flaky, buttery, and tender crust with jam-like caramelized pineapple filling. Absolutely delicious.
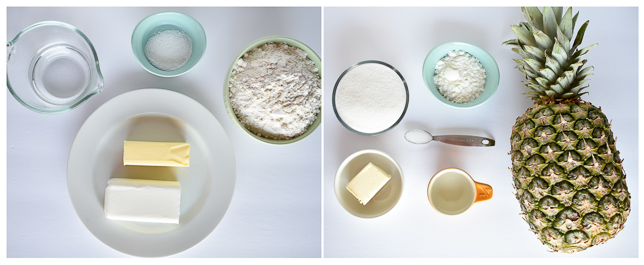
Dough
- 2 3/4 cups all-purpose flour
- 1/2 Tablespoon Kosher salt
- 3/4 stick (3 oz) cold unsalted butter, cut into small cubes
- 3/4 cup solid vegetable shortening, chilled and cubed (Solid shortening can be found in bars in the oil section of your store.)
- 1/2 cup very cold water
Pineapple Filling
- 1 whole pineapple, minced (see note for using canned pineapple) (Save any juices released during chopping. They will be used too.)
- 3/4 cup granulated sugar
- 1/2 teaspoon salt
- 3 Tablespoons cornstarch
- 1/4 cup water
- 3 Tablespoons unsalted butter
Egg Wash – used for shine & color (optional)
- 1 large egg
- 1 Tablespoon water
Dough (make at least 3 hours ahead as it needs to chill)
-
Place flour and salt into your mixer’s bowl and stir to combine. With mixer running at low speed, add chilled butter pieces one at a time. Once all butter is added and flour mixture looks crumbly, add shortening pieces in the same manner.
-
With mixer still running at low speed, drizzle water in. Mix just until dough comes together.
-
Gather dough, pressing together with your hands. Place onto plastic wrap and form into a rectangular or round disk (depending on what pie/tart pan shape you are using). Wrap well with plastic wrap. Refrigerate for at least 3 hours or overnight.
Pineapple Filling
-
Place pineapple (with its juice), sugar, and salt in medium-sized pan and bring to a quick boil. Reduce heat to low or medium-low and cook for 35 minutes making sure to keep at a gentle boil. Stir occasionally.
-
In a small bowl, dissolve cornstarch in water. Add to pineapple and continue cooking for 3-4 minutes until thickened. Add butter and stir to melt. Turn off heat and set aside to cool to near room temperature before adding to pie crust.
Tart/Pie Rolling & Assembly
-
To roll dough, lay a piece of parchment or wax paper on counter. Sprinkle liberally with flour. Flour rolling pin also. Remove dough from refrigerator and divide in half. Place one half back in the fridge. Roll to desired pan shape to about 1/8 inch in thickness. Make sure to roll wide/long enough to come up sides of pan. If sticking, sprinkle lightly with additional flour. Place dough (still on parchment/wax paper) onto a large baking sheet and place in the freezer for 5 minutes. This will help to keep it from falling apart when you transfer it to your tart pan or pie plate.
-
Remove from freezer and lifting dough gently, place into tart/pie pan easing the edges into place (I flip mine upside down onto the pan while still attached to the parchment paper). Cut away any excess dough. If it tears, just press back into place as best you can.
-
Add the room temperature pineapple filling and spread evenly. Place in refrigerator while rolling top crust.
-
Remove second crust from refrigerator and roll to 1/8 inch thickness as in step 1. Use as a whole crust, cut long strips for lattice top, or cut out decorations with cookie cutters. Place on top of filling.
-
Refrigerate tart/pie for 25 minutes (or freeze for 10 minutes). Remove from fridge and brush crust pieces only with egg wash, if desired. To make egg wash, mix egg and water together.
-
Place tart on a baking sheet and bake on oven’s middle rack in a preheated 375 degree oven for 40 minutes or until crust is light golden brown. Allow to cool to room temperature before slicing.
Dough may be made and refrigerated up to 5 days ahead or frozen for 1 month.
This recipe yields enough dough for 1 tart/pie with a double crust or 2 tarts with a single crust. Dough may be easily doubled.
1 (20 oz) can of crushed pineapple in pineapple juice can be substituted for 1 fresh pineapple. However, in my opinion, fresh pineapple results in deeper flavors and better caramelization.
Store at room temperature.
Love this!
Thank you 🙂
This is the best pie ever!!
Explore effortless travel with Airport Transfer DFW – the dependable answer for consistent airport transportation to and from Dallas/Fort Worth International Airport. Select from an array of upscale sedans, SUVs, and vans, chauffeured by skilled experts. Our round-the-clock service guarantees punctual arrivals, catering to both early mornings and late nights. Revel in transparent pricing, exceptional assistance, and worry-free journeys throughout Dallas. Secure your booking now for an expedition free of hassles!
A 24-hour reservation service is available for DFW Airport limousine service in the greater Dallas area, as well as the latest technology to dispatch and contact your driver.
Discover a range of Miami party bus options, including rentals in FL. Find cheap party bus rentals for your event. Explore diverse party bus rental services in Miami, FL, perfect for any occasion.
Discover Miami’s premier party bus rentals at bestmiamipartybus.com. Find convenient options for party bus rentals in Miami, FL, ensuring a stylish and memorable transportation experience for any event. Rent a party bus hassle-free in Miami, Florida.
With a focus on group travel, Maryland’s charter bus service offers motor coaches for transportation across Maryland and DC. Their reliable motor coach transportation ensures comfortable and efficient journeys, catering to diverse group transportation needs.
Experience hassle-free travel with Airport Transportation Bahamas. Whether you’re arriving or departing, our reliable services promise seamless airport transfers and convenient transportation solutions throughout the Bahamas.
We’re excited to provide professional transportation from Nassau Airport to the amazing Baha Mar. As the leading provider of transportation and special event services, we value trust and hospitality.
Bahamas Premium Transfers is proud to serve private transportation from Nassau Airport to Atlantis Resort with professional cheuffeur.
Niagara Falls Cab Company is a trusted transportation service provider in the Niagara Falls, Ontario region. They specialize in offering reliable and safe transportation solutions for passengers, ensuring convenient and stress-free travel experiences. Whether you need airport transfers or local rides, they prioritize customer satisfaction with their professional and punctual services.
Discover Niagara’s beauty with Cabs Niagara Falls Ontario. Reliable Niagara Falls Taxi and Niagara Taxi services for your convenience. Your partner in seamless transportation throughout the Niagara Falls, Ontario region.
Arrive in style with our Buffalo Airport Ground Transportation services. Whether it’s a car service or private transfer, we guarantee comfort and reliability for your journey from the airport to your destination.
Enjoy personalized Airport Mercedes Sprinter Transfers in Chicago. Our executive shuttle service offers comfort, reliability, and style for group travels. Whether for business or leisure, trust us for a luxurious and stress-free transportation experience.
Discover premier Washington DC Limo Service with professional chauffeurs. Enjoy luxury car rentals with drivers, exotic chauffeur services, and private car service to Dulles Airport. Affordable and top-tier transportation solutions await.
Simplify your airport transfer from LAX to Palm Springs with our dedicated transportation services. Rely on our reliable Palm Springs transportation for a seamless and timely connection, ensuring a hassle-free travel experience.
Experience luxury airport transport in Cape Town, offering premium chauffeur services and elegant vehicles. Ideal for travelers seeking comfort, convenience, and sophistication from arrival to departure.
Dubai Hummer Limo is a trusted name in the private car industry in Dubai. We offer a wide range of luxury cars at affordable rates and provide private chauffeur services, catering to all your transportation needs.
first-class tour of Dubai / Abu Dhabi city in mercedes Sprinter with uniformed, professional chauffeur drivers.
you are traveling for business or leisure, arriving on time for your flight is made easy with Rolls royce airport transfers from Airport Transfers Dubai
Little Stars Travel offers sports car rental services in Dubai, featuring a diverse range of high-performance vehicles. Whether it’s for leisure or special occasions, their rentals cater to car enthusiasts and travelers seeking an exciting driving experience to explore Dubai with style and speed.
If you’re planning a trip from Dubai to Abu Dhabi, transportation is an important factor to consider. While there are many options available, limo UAE is a great choice for many reasons. Not only does it offer a luxurious and comfortable experience, but it also provides numerous benefits that other forms of transportation can’t match.
I prefer to blind bake my pie crusts and tart crusts to ensure sturdiness – would it be okay to do that here